
Hello and Happy Easter! Nail art used to be an obsession of mine and there wasn’t a week that went by where polkadots or some kind of design adorned my tips. A few months back I fell out of love with it (probably due to a lack of time + working in retail ruins lives) but now the need for something a bit more on my nails is back, so expect a few more nail art posts or design features to come your way…
As it’s Easter, I thought I’d create something themed plus bunnies are the cutest (fact, you can’t argue against it). So, if you fancy having a little rabbit on your nails, keep reading for a ridiculously simple step by step guide…

What you’ll need:
1 | Background nail colour of choice: I went with Essie Mint Candy Apple because it goes nice with white
2 | Black and white nail art pens: Or you can use normal nail polish and a bobby pin!
4 | A bubblegum/mid-tone pink: For the ears and the cheeks.
3 | Shades to do the rest of your nails: I repeated the mint and the pink (Ciate Candy Floss) and added a light pink (Topshop Ethereal) to tie it in together.
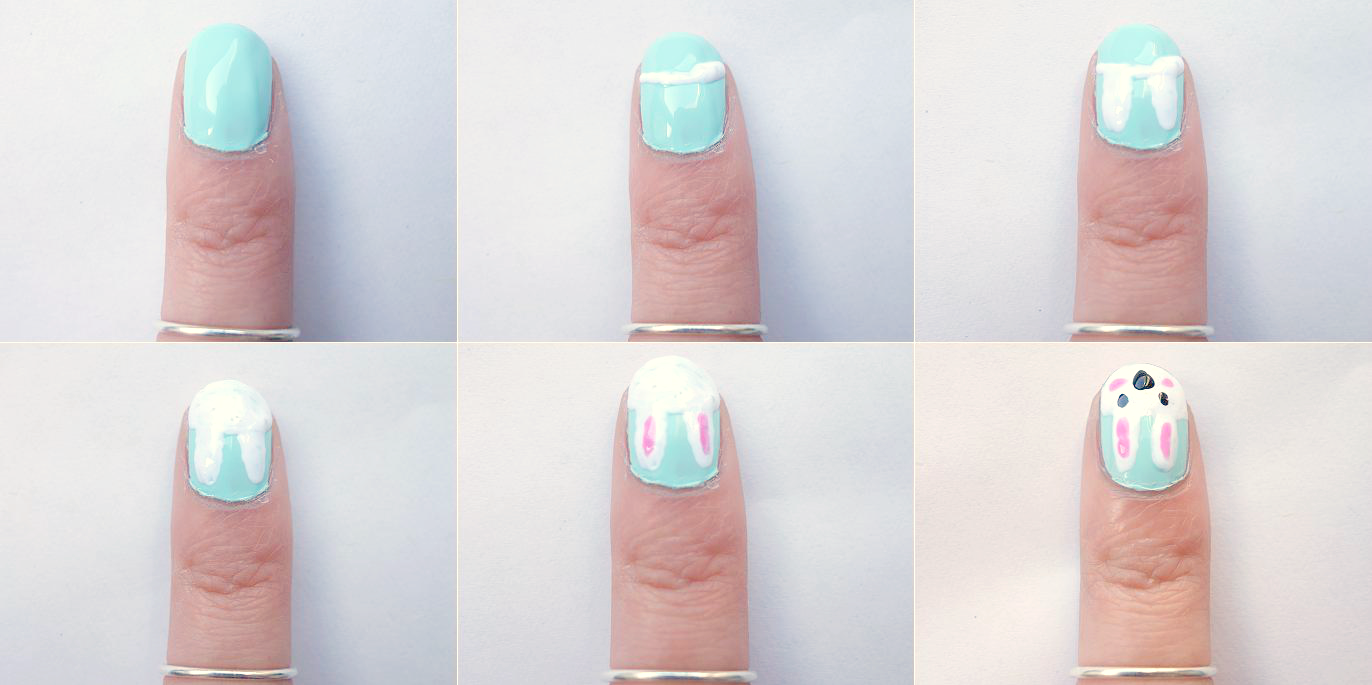
Step one | Paint your nail in your colour of choice, make sure it’s opaque!
Step two | Draw a curved line (with a pen or the tip of your brush or bobby pin) across the nail just over 2/3 of the way down. Aslong as the top of the line, nearest the base of your nail, is smooth the rest doesn’t need to be super neat.
Step three | Draw two ‘ears’ above the line. Try to make them slightly tapered so they look more real (basically, try to do them better than I did!)
Step four | Fill in the space at the bottom of your nail below the line until it’s opaque and looks like a bunny shape.
Step five | Paint two little pink lines in the middle of the ‘ears’.
Step six | With a black nail art pen, or black nail polish on a bobby pin, draw two dots for eyes and a little triangle or heart shape for the nose. Add two dots of pink for the ‘cheeks’ and you’re done!

Just paint your other nails in the colours you’ve picked, add a top coat and you’re all set for Easter (or any day, really, bunny nails aren’t limited by a holiday). You could draw other little patterns, like you’d find on easter eggs on the other nails too, if you wanted to be super themed! This was a really easy little nail art to do, so is great for beginners or anyone wanting to try out a little theme. Mine isn’t perfect, as I’m only just getting back into nail art, but it’s not bad for a first attempt. Are you going to try anything like this for Easter or Spring?
helen x | twitter | instagram | bloglovin
Check out these lovely blogs: Kim Radley and Style Yourself Vintage!

